How to build a winter waterfall
On this webpage I'll be going over the steps I took to create a tabletop winter waterfall. The basics of this process are very similar to the other waterfall that's on this site -made for a tabletop or display piece.
There are quite a few waterfalls that could be incorporated into a pet's cage on this site, but make sure you research whether or not the pet you have would safely be able to interact with water.
This project is not meant for a pet, but more for those interested in scale model building. This could be incorporated into a model railroad display adding a touch of realism that could really inhance the landscape.
The first step I take is usually to look at pictures of real nature shots that might give me some ideas on the final look of the design. From there, I sometimes draw out a simple sketch of what I want for the general look of the structure. I then figure out what I want the dimensions of the structure to be, -how long, wide, deep and tall should the tabletop waterfall be (maybe it's a case of needing to fit the sculpture in a specific area).
Be sure to check out the video below on how to build a winter waterfall.
 |
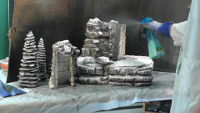
Then I move on to cutting up some pieces of polystyrene to build up the size of the structure. Since around 2011, I've been using some hot wires from the Hot Wire Foam Factory. |
These tools alow you to cut through foam very easily -and greatly speeds up the process of sculpting the basic form of the waterfall. I have a detailed list of materials on the FAQ page that features a video that goes over all of the items needed to make any of the projects listed on this website.
|
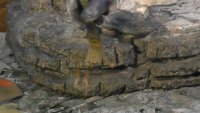
After cutting away at the polystyrene, and gluing together all of the pieces, I moved on to the mortar stage. I used a product called Foam Coat from the Hot Wire Foam Factory. |
 |
Foam coat is designed to be applied to EPS foam and acts as a strengthening agent, plus enhances the look of your design by making the structure look more like realistic rock. For this tabletop waterfall I applied one good coat to the structure, but if you're wanting to make the project stronger -then apply more coats to get the desired strength.
After I applied one coat of foam coat I let that dry and applied a layer of water resistant sealant to the areas that will have water on it 24/7. I did this as a test to check the project for leaks. I waited 72 hours and then poured water into the structure to see if I needed to make any changes. It's better to find out early as opposed to after the waterfall is done -when you might need to tear into it to fix a problem.
 |
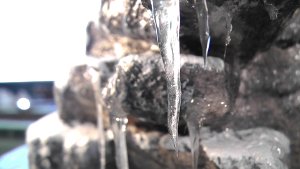
Next, I moved onto the painting stage. This was a fun process because I'd never done a winter waterfall theme. I incorporated some traditional scale model building techniques, as well as |
some ideas from past projects that I've done on this site. First, I tried a different painting process with a techique of using paint washes. I mixed a lot more water into a color that I was applying and did a series of washes that can better be understood by watching the video above on how to build a winter waterfall (especially the section on how to make fake icicles).
|
After the rock was completed, I moved onto the "snow" stage. This was rather easy, because all I did was apply white paint to certain areas to indicate the build up of snow. |
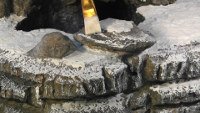 |
I used a technique whereby I tapered the snow application in specific areas to give a more natural look to how snow would actually fall onto rocks -whether they be flat or have sharp drop offs to their topography.
 |
After the paint job was complete, I proceeded to seal it with an acrylic sealant called Shields All, which can be found as part of the materials list located on the FAQ page of this site. |
|
I applied 4 layers -allowing 72 hours in between layers for dry time. After that was completed I applied aquarium grade silicone to all of the areas that would have water on it 24/7. I did this outside because of the fumes that silicone gives off, then I let it air out for around 4 days, and then brought it inside. |
As a final stage I applied some of the same sealant to certain areas and then sprinkled colored sand on those sections. This step can enhance your scale model building results by improving the realistic look of the rock, and in this case, the build up of snow.
Be sure to watch the video above on how to make a tabletop waterfall with a winter waterfall theme.
